With the drive done, I looked at the Raspberry Pi and the many parts included in the case I bought for it. If you buy only a Raspberry Pi, below is what you receive.
 |
| Raspberry Pi 4 unboxed |
The case comes with more than just a case. There are heat sinks, the case, a fan, screws for it all, and some rubber feet. The larger part of the case at the top-right of the image below separates into two smaller pieces so that the Raspberry Pi can fit inside. The heat sinks are the four small pieces by the handle of the screwdriver. One is upside-down (blue side up) to show that they came with adhesive backing.
 |
| Parts of the case |
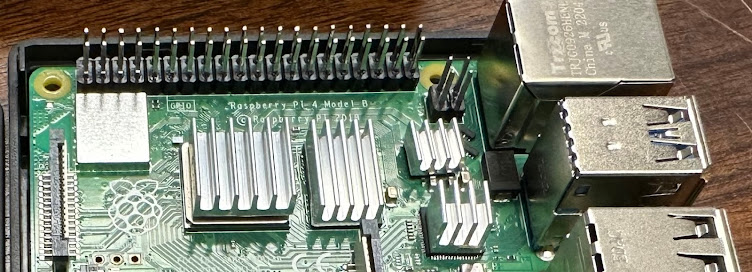
Below is an image of the Raspberry Pi with the aluminum heat syncs attached. They are the four, finned, flat grey structures in the center. I put all the fins in the same direction in the hopes that it would help dissipate heat (and that's what the image on the box showed).
 |
| Heat sinks attached |
Next was getting the fan screwed into the ceiling of the case and plugging it into the correct pins (power, ground, and on-off toggle).
 |
| Fan screwed into the ceiling of the case |
In the picture above, the fan will blow at you, and that will eventually be down into the case.
 |
| The fan will close down onto the components |
Next, the fan is attached to the three pegs needed for it to function. Then, it is seated into the main body of the case. Lastly, that all comes down over the top of the circuitry to create a completed Raspberry Pi and case.
 |
| Cords attached and case ready to be closed up |
Next two pictures are: the bottom of the case after I attached the rubber feet, and the completed case with a 12-ounce can for comparison.
 |
| Rubber, shock-absorbing feet |
 |
| Raspberry Pi is assembled! |
 |
| Hmm... Leftover screws |
The completed set-up is below.
 |
| Click to expand and view labels |


No comments:
Post a Comment