The Raspberry Pi and its components were assembled, connected to each other, and ready to go. But, the Raspberry Pi needed an operating system (OS) first. There are many choices for OS, but the first videos I saw used Umbrel as the OS. So, I decided upon that. In a previous post, I showed the Raspberry Pi with a Micro SD card in its port. That is what contained the operating system. I'll put that image in here again, below.
 |
| The OS is on that small, fingernail-sized card |
The process for getting the operating system onto that Micro SD card uses a computer and an adaptor that lets that Micro SD card insert into the USB port of the computer.
 |
| Side view of closed adaptor and the Micro SD card |
 |
| Top view of the adaptor |
You need two files. One is the "disk image" of the operating system. It gets written onto the Micro SD card in a manner that is readable by the Raspberry Pi. The other is a program that will burn that operating system onto the card. That program is Balena Etcher.

Once both packages are downloaded and unzipped, the Balena Etcher--with the Micro SD card attached via the USB adaptor--will put the operating system, Umbrel, onto the card.
 |
| The install and verification took about 5 minutes |
That Micro SD card, with the operating system installed, is what you saw placed into the Raspberry Pi's port above. With that in place, the first time the Raspberry Pi is powered on, it should be able to see that program and use it as its operating system from that point onward.
It was all set-up and ready to be powered on.
 |
| Click to expand and view labels better |
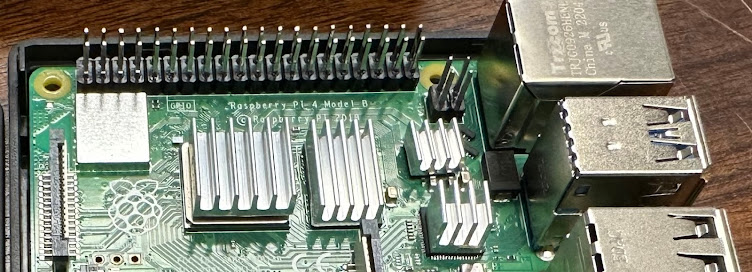
In the image above, pay attention to the area into which the USB port is plugged into the Raspberry Pi.
I powered on the whole mess of devices. And... Partial success!
 |
| Umbrel installed successfully |
The Umbrel OS install worked. However, the Raspberry Pi cannot see the hard drive. That worried me, as I thought I had made an error in getting the kind that I did. I did try the restart as suggested in the image above. However, it came back to that same page.
(I haven't mentioned until now, but the Raspberry Pi has no monitor and no keyboard. It is accessed with a web browser. The window of the browser acts as the monitor for the Raspberry Pi. The keyboard is just your computer's keyboard.)
I then tried two things at the same time. One, I shut down all the components with the intent of starting up the hard drive first, then the Raspberry Pi. Two, I noticed that the USB plug-in from the drive to the Raspberry Pi was blue. I don't know if that's important, but I noticed that the Raspberry Pi's receiving, female ports were two black and two blue.
 |
| Click to expand and view labels better |
I'm not sure which was the key to making it all work, but I believe that it was the USB port. (***Edited on 10/3/23 to add, "Yes, checking Umbrel's forums, any drive needs to be connected to the blue USB ports.***) With that change, I powered it up and was greeted with the following:

Finally, I could download the Bitcoin Node and the Lightning Node apps. I can't get into the Lightning Node app until the Bitcoin Node finishes synchronizing. That could take days.
No comments:
Post a Comment