Featured Post

Monday, October 30, 2023

My current understanding of the need for, and functioning of, LN

Limitations of the blockchain:

The Bitcoin (BTC) blockchain, also called "layer 1," is secure but relatively slow.  It can handle about 3 - 7 transactions per second.  By comparison, Visa and MC can handle thousands of transactions per second.  When BTCs layer 1 has many transactions pending, the costs to entice a miner to record your transaction can become expensive.  As I write this, I see that some transactions are costing $12, $17, or even more.  Others, though they might have lower fees, can take hours to process.

"You can't buy a cup of coffee with Bitcoin":

So, the two problems that keep people from buying a cup of coffee with BTC are:  (1) the fee could cost several times more than the purchase and (2) if the fee is lower, your transaction might not clear for tens of minutes or even an hour or more.  To save money, people aren't going to sit in the coffee shop for half an hour waiting on the cheaper transaction to record before the barista gives them their coffee.

So, the common complaint about BTC is that it is a store of value more than a currency to use day-to-day.  "Nobody is going to buy a coffee with Bitcoin" is a common saying.

A potential solution in layer 2, or the Lightning Network:

Lightning Network (LN) offers a solution to both of the numbered problems above.  (1), regarding fees, LN transactions are often fractions of a penny.  (2), regarding speed, LN transactions usually take only a few seconds.  I myself bought a Panda Express gift card using LN.  It was free (because I bought it through my own node) and took about one second between the time I authorized the payment from my phone and the time that the website registered that I had successfully paid for the gift card.

LN also seems to solve the problem with BTC's limited number of transactions per second by allowing this to scale up with the number of nodes and channels on the network.

How Lightning Network works:

At the most basic description, LN is a network or web of nodes and the channels between them.  If I have 1,000,000 sats (0.01 BTC) unused on my node, for example, I can make a channel of that size or two of half that size, and so on.  The creation of that channel is a transaction that must be recorded on the blockchain.  So, the fee and speed limitations are potential problems with only the opening of the channel.

Once the channel is in place, it can remain open indefinitely, processing transactions "off-chain" in its own layer, layer 2, the network of nodes and channels that make up LN.

A good way to a channel is as one row on an abacus.

In the image above, imagine that the abacus represents five channels (red, orange, yellow, green, and blue).  When your node opens a channel, all the beads are on your side of the channel; all the sats are yours.  The on-chain transaction basically tells the blockchain that such a row of beads exists between your node and the other node, the remote or inbound side.

A node ideally has many channels that have the potential to route inbound and outbound traffic.  If each bead above was 100,000 sats, the red and blue channels can route 700,000 sats of payments from your node to the other side.  After such a thing happened, all the beads would be on the remote side, ready to come back to you of a payment were routed from that remote node back to yours.

Similarly, the green channel could route 200,000 sats to your node or 800,000 sats from your node.

In such a manner, any one channel might route millions, tens of millions, or more sats over its lifetime.  Your node earns sats only on forwarding transactions (that is, sending them to the other node from yours).

If both nodes are happy with the channel, each may choose to never close it.

Once a channel is closed, the opener pays the on-chain fee for the blockchain to see the current state of the abacus/channel, record it on the chain, and distribute it to the two nodes.

If the yellow channel were closed, for example, your node would get 500,000 sats, and so would the remote node.  Whoever opened the channel would pay the on-chain fee from those 500,000 sats.

May write more later, but wanted to publish this for now.
Saturday, October 14, 2023

Node Operational for One Week

Downloading the BTC blockchain to the node took about three days.  Last weekend, I was able to install and open the app Thunderhub to run my node.  The first step was to send BTC to the node's BTC wallet.  That is the source of BTC that is used to open channels.  The node also has a Lightning wallet address.

I used LightningNetwork.Plus to open most of my 22 current channels.  They have several services, but one is that two others and I form a "liquidity triangle."  A opens a channel to B.  B opens and channel to C, and C opens one back to A.  They are useful to quickly give my node two channels for the price of opening just one.  Also, one of the channels, the one opened to me, is fully funded on the inbound side to give me inbound liquidity.

As I was doing this, I also opened two channels to merchants that sell gift cards for BTC and other crypto.  The hope is that these channels will be "fee farms" as people use them to buy gift cards by routing Lightning payments through my node.

I've had two people open channels to me, unsolicited.  That may be a good sign that my node is showing up on searches as "good," that it is well-connected, or that its name and description are attractive to people.

Regarding channels, I'm finding that evenings in my time zone and weekends tend to have lower on-chain fees.  Because the only way to earn BTC is by a channel forwarding Satoshis, or Sats (*1), the lower the opening cost, the sooner the channel will be in the positive.

Another tactic here seems to focus on larger channels.  If it costs me 1,000 Sats to open a channel and that channel is only 50,000 Sats, it will have to do a lot of work back and forth before it pays for its opening cost.  If it costs the same to open a 5,000,000 channel, it can more quickly pay for itself via its fees.

Going forward, I'm going to set a target of 4 to 5 million Sats for channels I open.

For channels that are opened to me, since they are "free" from my point-of-view, I'll let them be any size.  Also, I might as well keep them open as long as the other person wants them to be open, for they'll only feed me liquidity and increase my routing capacity.

*1 = A Satoshi is 1/100,000,000th of a BTC or 0.00000001 BTC.

Tuesday, October 3, 2023

Need to Change My Drive

I think I need to change the drive in my set-up.  I bought a non-SSD drive.  That is, the older, "spinning disk" kind of drive.  But, because the node will be functioning 24/7, such a drive will burn out early.  I'll return it and get a solid state drive (SSD).  So, I paused the syncing of the Bitcoin Node app and removed it and the Lightning app from the Pi.  Basically, since I know very little about command line, I'm going to restart the process with the new drive on Thursday.

Monday, October 2, 2023

Pinned Post with Table of Contents

Putting this here as I try to figure out how to make this site more navigable.  Posts in chronological order below with a brief summary.

  1. Tour of Just for Krypto's Mine:  Pics and videos from a tour of a facility that has 4,300+ Bitcoin miners.
  2. Lightning Network Discussions:  Discussions on the bus ride, to and from the mine, that really prompted me to learn more about Bitcoin and the Lightning Network.
  3. Making a Node with Raspberry Pi:  Contains one of the first videos I watched and some links to what I bought to create my own Lightning Network node on a made-at-home computer called Raspberry Pi.
  4. Learning More about Lightning Network:  I knew how to make the computer, but I was still learning more about the network itself, how it cheaply and quickly moves Bitcoin, how to profit from it, and so on.
  5. Lightning Network Channel Strategies:  I came to learn that channel management is a key part of node profitability.
  6. Hash Time-Lock Contracts (HTLCs):  Brief post with my then-current understanding of HTLCs.
  7. Making the Node, part 1 of 3:  Here, I use pics and text to describe putting together what will be the node's disk drive.
  8. Making the Node, part 2 of 3:  Here is the bulk of the Raspberry Pi's hardware set-up.
  9. Making the Node, part 3 of 3:  This is the operating system (OS) installation, firing up Umbrel, and starting the node synchronization.
  10. Need to Change My Drive:  I should be using a solid-state drive (SSD), and that is not what I bought.
  11. Update After 1 Week of Noderunning:  22 open channels and ~57,000,000 Sats in capacity.
  12. My Current Understanding of BTC/LN Things.

Making the Node: Operating System and Software

The Raspberry Pi and its components were assembled, connected to each other, and ready to go.  But, the Raspberry Pi needed an operating system (OS) first.  There are many choices for OS, but the first videos I saw used Umbrel as the OS.  So, I decided upon that.  In a previous post, I showed the Raspberry Pi with a Micro SD card in its port.  That is what contained the operating system.  I'll put that image in here again, below.

The OS is on that small, fingernail-sized card

The process for getting the operating system onto that Micro SD card uses a computer and an adaptor that lets that Micro SD card insert into the USB port of the computer.

Side view of closed adaptor and the Micro SD card
Top view of the adaptor

You need two files.  One is the "disk image" of the operating system.  It gets written onto the Micro SD card in a manner that is readable by the Raspberry Pi.  The other is a program that will burn that operating system onto the card.  That program is Balena Etcher.

Once both packages are downloaded and unzipped, the Balena Etcher--with the Micro SD card attached via the USB adaptor--will put the operating system, Umbrel, onto the card.

The install and verification took about 5 minutes

That Micro SD card, with the operating system installed, is what you saw placed into the Raspberry Pi's port above.  With that in place, the first time the Raspberry Pi is powered on, it should be able to see that program and use it as its operating system from that point onward.

It was all set-up and ready to be powered on.

Click to expand and view labels better

In the image above, pay attention to the area into which the USB port is plugged into the Raspberry Pi.

I powered on the whole mess of devices.  And...  Partial success!

Umbrel installed successfully

The Umbrel OS install worked.  However, the Raspberry Pi cannot see the hard drive.  That worried me, as I thought I had made an error in getting the kind that I did.  I did try the restart as suggested in the image above.  However, it came back to that same page.

(I haven't mentioned until now, but the Raspberry Pi has no monitor and no keyboard.  It is accessed with a web browser.  The window of the browser acts as the monitor for the Raspberry Pi.  The keyboard is just your computer's keyboard.)

I then tried two things at the same time.  One, I shut down all the components with the intent of starting up the hard drive first, then the Raspberry Pi.  Two, I noticed that the USB plug-in from the drive to the Raspberry Pi was blue.  I don't know if that's important, but I noticed that the Raspberry Pi's receiving, female ports were two black and two blue.

Click to expand and view labels better

I'm not sure which was the key to making it all work, but I believe that it was the USB port.  (***Edited on 10/3/23 to add, "Yes, checking Umbrel's forums, any drive needs to be connected to the blue USB ports.***)  With that change, I powered it up and was greeted with the following:

Finally, I could download the Bitcoin Node and the Lightning Node apps.  I can't get into the Lightning Node app until the Bitcoin Node finishes synchronizing.  That could take days.


I'll leave things there for the moment.  Once it finishes syncing the Bitcoin chain/node, I can dig into the Lightning node more.

Making the Node: Assembling the Raspberry Pi and Finishing Set-up

With the drive done, I looked at the Raspberry Pi and the many parts included in the case I bought for it.  If you buy only a Raspberry Pi, below is what you receive.

Raspberry Pi 4 unboxed

The case comes with more than just a case.  There are heat sinks, the case, a fan, screws for it all, and some rubber feet.  The larger part of the case at the top-right of the image below separates into two smaller pieces so that the Raspberry Pi can fit inside.  The heat sinks are the four small pieces by the handle of the screwdriver.  One is upside-down (blue side up) to show that they came with adhesive backing.

Parts of the case

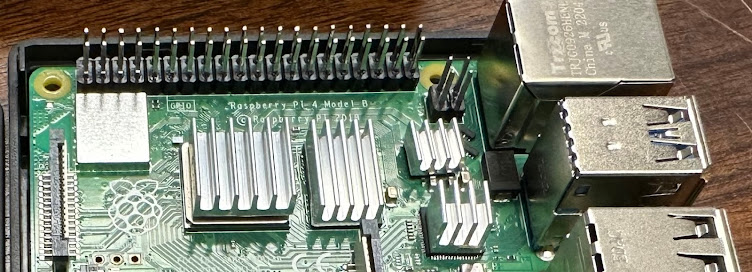
Below is an image of the Raspberry Pi with the aluminum heat syncs attached.  They are the four, finned, flat grey structures in the center.  I put all the fins in the same direction in the hopes that it would help dissipate heat (and that's what the image on the box showed).

Heat sinks attached

Next was getting the fan screwed into the ceiling of the case and plugging it into the correct pins (power, ground, and on-off toggle).

Fan screwed into the ceiling of the case

In the picture above, the fan will blow at you, and that will eventually be down into the case.

The fan will close down onto the components

Next, the fan is attached to the three pegs needed for it to function.  Then, it is seated into the main body of the case.  Lastly, that all comes down over the top of the circuitry to create a completed Raspberry Pi and case.

Cords attached and case ready to be closed up

Next two pictures are:  the bottom of the case after I attached the rubber feet, and the completed case with a 12-ounce can for comparison.

Rubber, shock-absorbing feet
Raspberry Pi is assembled!
Hmm...  Leftover screws 
The completed set-up is below.
Click to expand and view labels

Making the Node: Assembling the Raspberry Pi's Drive

I have all the parts that I ordered (and a few cables and items from my own supply) to make the Lightning Network Node on a Raspberry Pi.  See this blog post for background and a YouTube video link and some links to what I found on Amazon that would complete the computer that I'll be making.

The main purchase was this Raspberry Pi kit suggested by a video I watched.

Raspberry Pi's box top
Side panel w/ features

The other parts include an internal disk drive and its case.  The two together are generally cheaper than buying an external drive that needs no assembly.  Once the drive is in the case, it will function like an external drive for the Raspberry Pi (which has no hard drive of its own, I believe).

The case and components
The drive

This was easy to assemble.  There is little room for error; things fit together only in one way.

Case, opened, on left; drive on right
Drive plugged into case's circuitry

The drive plugs into an insert/board.  It seemed snug, but there are screws included in the kit that can be used to further secure the two together.

Underside of the assembled case + disk
Close-up of empty screw holes

I put in the four screws, assembled the whole thing, and I was done with the hard drive.  The device below will plug into the Raspberry Pi to be it "hard drive."  The main thing stored on it will be the full Bitcoin node--a full copy of all the transactions that have ever happened on the Bitcoin network.  That is necessary for the Lightning node to function.

Assembled drive

Overall, that was not too difficult.  On the videos I watched, I saw that their drives were powered by the Raspberry Pi's port and not an external power cord (like I have above).  I hoped it would not matter.  If it worked, and I just needed another open outlet for it...  Fine by me.